It is challenging to start yoga due to its old-sounding names and hard-to-do poses. Being a beginner, you must feel overwhelmed by these names. But yoga is simple enough. Even when you get up in the morning and stretch your arms usually, you complete a simple yoga pose. You may start with simple yoga poses to maintain your health and stay fit and fine. You can take on more challenging yoga poses as your body gets used to it.
10 Beginners Yoga Poses
Here are ten must-try yoga poses for beginners that they can perform efficiently but under proper guidance:
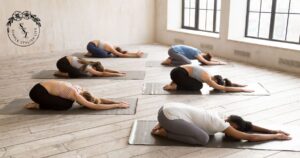
Balasana (Child Pose):
Balasana is also called child pose. In this yoga pose, you may stretch your hips, legs, and thighs and release all the tension and stress. If you want a good resting pose, it is one of the best poses for beginners and yoga practitioners of all levels.
How to do it?
The following are the steps to perform the child pose perfectly:
- Kneel on the floor. Join your toes together and sit on your heels. Now, you have to separate your knees as wide as your hips.
- Exhale and lay your abdomen resting between your inner thighs and rest your forehead on the floor or the mat.
- Place your arms by your side and palms facing up near your feet.
- Stay in this pose for at least eight breaths.
Tip to remember for beginners
It might be challenging to start this yoga pose. So you can put a blanket or towel under your hips, knees, or head. Also, if you are pregnant, spread your knees wide apart so you may not pressurize the abdomen.
Benefits
- It helps in relaxing your back muscles.
- With a child pose, you can release any tension in your pelvis.
- It helps in increasing the blood flow towards the neck and head.
- It helps in stimulating the digestive system.
- It also relieves constipation.
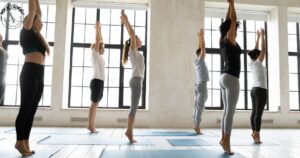
Tadasana (Mountain Pose):
As the name says, this pose teaches one to be steady like a mountain. It is the base of all the standing yoga poses. It includes a lot of muscles such as shoulders, thighs, pelvis etc. It is one of the best poses a beginner can try because it is easy and offers excellent benefits.
How to do it?
The following are the steps that you can follow to do a mountain pose:
- Stand with your toes and heels apart slightly. Hang your arms down beside the torso.
- Spread your toes. Place your weight on your feet equally. Firm your thigh muscles and rotate them inwardly.
- Relax your shoulders and roll them back and down.
- When you inhale, stretch your torso out. When you exhale, release your shoulder away from your head.
- Your hands can be in a prayer position before the chest or just by the sides.
- Take long, slow, and deep breaths in.
Tip for beginners
You can take the help of the wall on your initial days to stand straight and align your body perfectly. You can also raise your hands and stretch them. Remember to breathe easily.
Benefits:
The benefits of Tadasana are mentioned below:
- It improves a person’s concentration and focus.
- It helps to improve spinal postures and coordination.
- It boosts circulation.
- It helps in strengthening your back, hips, and legs.
- It relieves sciatic pain.
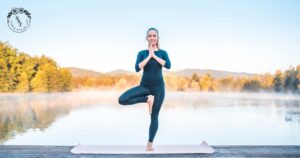
Vrksasana (Tree Pose):
After learning the mountain pose, it is easier for beginners to do the tree pose because the mountain pose already taught you the steadiness you need. This yoga pose helps you to learn how to stay steady with your breath and body while standing on one foot.
How to do it?
To do vrksasana properly, you have to follow the steps mentioned below sequentially:
- Stand straight by placing your feet together.
- Place your right foot on the inner upper thigh of your left leg.
- Fold your hands in a prayer position and find a spot to stare steadily.
- Hold your breath for 1 to 2 minutes in the initial stages. After that, change your side and repeat the same process on the other side.
Tip to Remember
For the starting stage, you can take the help of a wall. Also, keep in mind not to lean on the leg on which you are standing, or you might hurt yourself.
Benefits:
There are many benefits of tree pose, which are mentioned below:
- Tree pose helps you improve balance.
- It also helps you to open up your hips.
- Steadily gazing at a point might improve your focus and concentration.
- When you put all the balance on a foot, you might stretch your ankles, legs, and spine. This results in strengthening them.
- Standing straight may help you to lengthen your spine.
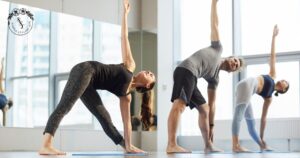
Triangle Pose (Trikonasana):
The triangle pose is easy for beginners as you have already learned the mountain and tree poses. It is similar to those yoga poses and helps to stretch your legs, increase flexibility in shoulders and hamstrings, and help you gain balance.
How to do it?
To follow the steps of the triangle pose properly, read the following steps:
- Stand with your feet apart as much as you can. Place your right foot at 90 degrees, where your leg should be near your torso.
- Keep your feet pressed to the ground and achieve the balance of the whole body on both feet.
- Next, try to place your right hand on the ankle of the right foot or the floor next to the right foot.
- Stretch your left arm towards the ceiling.
- Look steadily towards your left hand and stay in the pose for 30 to 60 seconds.
- Inhale to return to normal and repeat the process on the other side.
Tip to remember
Being a beginner, you can use the wall to stay steady in this pose. Place your back heel or the back of your torso against the wall.
Benefits
Here are some benefits of doing the Triangle pose:
- It strengthens your legs and back as you balance your whole body over them.
- It stretches the legs, hamstrings, spine, shoulders, etc.
- It flows energy in the body and improves balance and focus.
- It boosts abdominal organs.
Garland Pose (Malasana):
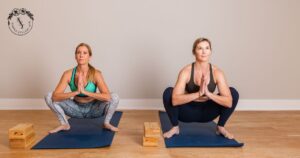
Every person is known to squat nowadays. It is an advanced form of Garland pose. It helps to release all the tension and stress in your hips and legs. That is why it is also called “Hip opener” yoga pose.
How to do it?
Here are the steps that you can follow to do a proper Garland Pose:
- Stand with your feet about a mat’s width apart.
- Bend your knees and lower your butt just like doing a squat.
- Your toes might turn out, and this is natural. But do not overdo it. You have to keep your feet in parallel.
- Put your upper arms inside your knees and bend the elbows to put the palms in the prayer position.
- Keep your spine straight, your butt moving toward the floor, and your shoulders relaxed away from your ears.
- Hold the position for 30 to 60 seconds and then return to rest.
Tip to Remember
While doing this pose, keep the balance steady for the whole body so you might not hurt your legs or feet.
Benefits
Here are some benefits of the garland pose that keep you healthy:
- It stretches your stomach, thighs, pelvis region, and spine.
- It helps women with UI, PCOS, and pelvic health.
- It tones the belly.
Seated Forward Fold (Paschimottanasana):
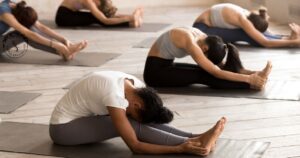
When you feel too much stress and tension in your hamstrings, lower and upper back, and sides, you should try paschimottanasana because it helps in stretching the whole body from top to bottom.
How to do it?
Follow the below-mentioned steps to do a perfect Seated Forward Fold:
- Sit on the floor and extend your legs in front of you.
- Breathe in. Raise your hands over your head and stretch. Extend the arms forward, reaching for your feet.
- Lift your chest, engage your lower abdominals, and imagine your belly button moving toward the top of your thighs.
- Stay in this position for at least 30 seconds.
- Exhale and return to the primary position.
Tip to Remember
Initially, you can bend your knees to do this yoga pose, but later on, try to keep your legs straight to stretch them properly.
Benefits
Here are some benefits of Seated Forward Pose:
- It stretches the entire back and releases the stress and tension in the whole body.
- It helps to lengthen the legs and spine.
- It helps in relieving various digestion problems such as constipation.
- It massages the internal organs, especially the digestive system.
- It vitalizes the nervous system.
Bridge Pose (Setubandhasana):
Bridge pose, as the name says, is a bridge between your body and mind. It is very easy for beginners as it helps them stretch their front body and strengthen their back body.

How to do it?
The following steps will help you practice the Bridge pose entirely:
- Lie on your back and bend your knees.
- Place your palms face down and extend your arms to each side of your body. Spread your feet hip-width apart.
- Press down through the feet and hands and lift your hips above the ground without squeezing the glutes.
- Interlock your palms and press the shoulders towards the floor.
- Hold it for 8 to 10 breaths, then lower down your hips. Repeat it two more times.
Tip to Remember
In the initial stages, you can take the help of a block and release the lower back. It will also help you in easing the menstrual cramps and discomfort.
Benefits:
By doing the Bridge pose, you can have the following benefits:
- It calms your mind.
- It stretches your neck and shoulder.
- It helps in controlling mild depression.
- It also improves digestion.
- It lengthens your hip flexors.
Cobra Pose (Bhujangasana):
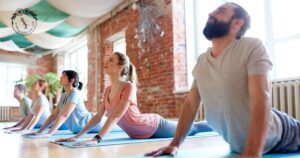
The yoga pose, Bhujangasana, is where you can stretch your upper body properly, just like a cobra. It helps you to form an excellent foundation for more complex poses like Urdhava Dhanurasana, an upward-facing bow.
How to do it?
Here are some steps that you can follow to do Cobra pose properly:
- Lie down on your belly, keep your feet hip-distance apart, and place your hands beside your ribs.
- Stretch your toes straight back and press down with the help of your toenails so that your quadriceps are being activated.
- Rotate your inner thighs towards the ceiling so that you broaden your lower back.
- Press down with your hands lightly and start lifting your hands and chest. Roll your shoulders back and down equivalently.
- Try to keep your neck long and focus on lifting your sternum. Straight your arms and keep your shoulders away from your ears.
- Stay in this position for 30 seconds initially, then return to normal.
Tip to Remember
If you feel discomfort in your lower back, try to rise low in the pose initially. When you think your body is becoming accustomed to the pose, grow more than before.
Benefits
You will get the following benefits when you practice this pose daily:
- It will reduce your back pain and improve spinal postures and circulations.
- You will improve your flexibility and alignment of the whole body.
- It reduces your stress.
- It massages and regulates the adrenal and thyroid glands.
- It opens the shoulder blades, lungs, neck, and collar bones.
Cobbler’s Pose (Baddha Konasana):
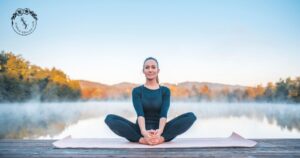
Another easy yoga pose for beginners is Cobbler’s, as it stretches your hips and inner thighs properly. It is efficient for those who want to lengthen and stretch their spine.
How to do it?
Here are the steps to do Cobbler’s pose correctly:
- Sit on your hips with your legs extended forward.
- Bend your knees and allow them to fall open to the sides.
- Place the soles of your feet together just like praying but with feet. With the help of your hands, try to open your feet just like opening pages of the book.
- Press your shoulder against your upper back to lift through your chest, and clasp your ankles to help you find lift along your torso.
- Stay in this position for 40 seconds and return to normal after that.
Tip to Remember
If you have difficulty bending your knees to the ground, do not worry. Try to touch your knees to the ground as much as possible at the start, and put pressure daily to touch the ground.
Benefits:
Here are the benefits of the Cobbler’s pose:
- It stretches your hips, groin, knees, and inner thighs.
- It helps to improve the circulation in the pelvis, relieving you from menstrual cramps and some symptoms of menopause.
- It calms the mind.
Corpse Pose (Savasana):
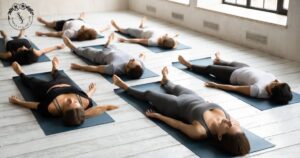
Every yoga pose is completed with some relaxation. The best yoga pose for relaxing is the Corpse pose, also called Savasana. But it is not as easy as the name. You should stay present and aware during the five to ten minutes you spend in final relaxation.
How to do it?
Here are the steps on how to do a corpse pose:
- Lie down on your back with separated legs and arms away from the torso. Turn your palms to face upwards.
- Allow your breathing to occur naturally. Let your mind concentrate on your breath so it does not wander here and there.
- Stay in this pose for a minimum of five minutes. Slowly, you can grow this to ten minutes.
- When you are coming back to your senses, start deepening your breath. Then, shake your fingers and toes, which reawaken your body. After this, stretch your body slowly from hand to knees and turn to the sides. With the help of your hands, bring yourself back to the sitting position.
Tip to Remember
Place a folded blanket over the thighs to emphasize the feeling that the body is rooted in the earth. Even a block under your navel has a similar effect as an eye pillow.
Benefits:
Here are the benefits of Corpse Pose:
- It calms your central nervous system, aiding the digestive and immune systems.
- It soothes your mind and relieves stress.
- It reduces headaches, fatigue, and anxiety.
- It helps to lower the blood pressure.
Conclusion
While learning anything, it is essential to learn everything with plenty of time so you will not injure or hurt yourself. The same thing goes with the yoga poses. Give yourself proper time daily or every few days to relax in a comfortable space and review your practice.

